Showing posts with label Book boxes. Show all posts

Friday, 18 January 2013

Square or Circular Book Box


The book box above was adapted from a Japanese card structure that I first saw in an old book I have called Creative Cards by Yoshiko Kitagawa, Kodansha International 1987.  The book and box above were also made a long time ago in 1997.

I used the card structure for my 2012 Christmas card and I will show how I adapted it into a book box.  The pattern for the card is based on a square with semicircular flaps.


The flaps are folded over consecutively and when you fold the last one you need to tuck it in under the first one and it looks like this.

The finished book box will also look like that. 

 I added the width of the book's spine to the pattern to create a box structure.


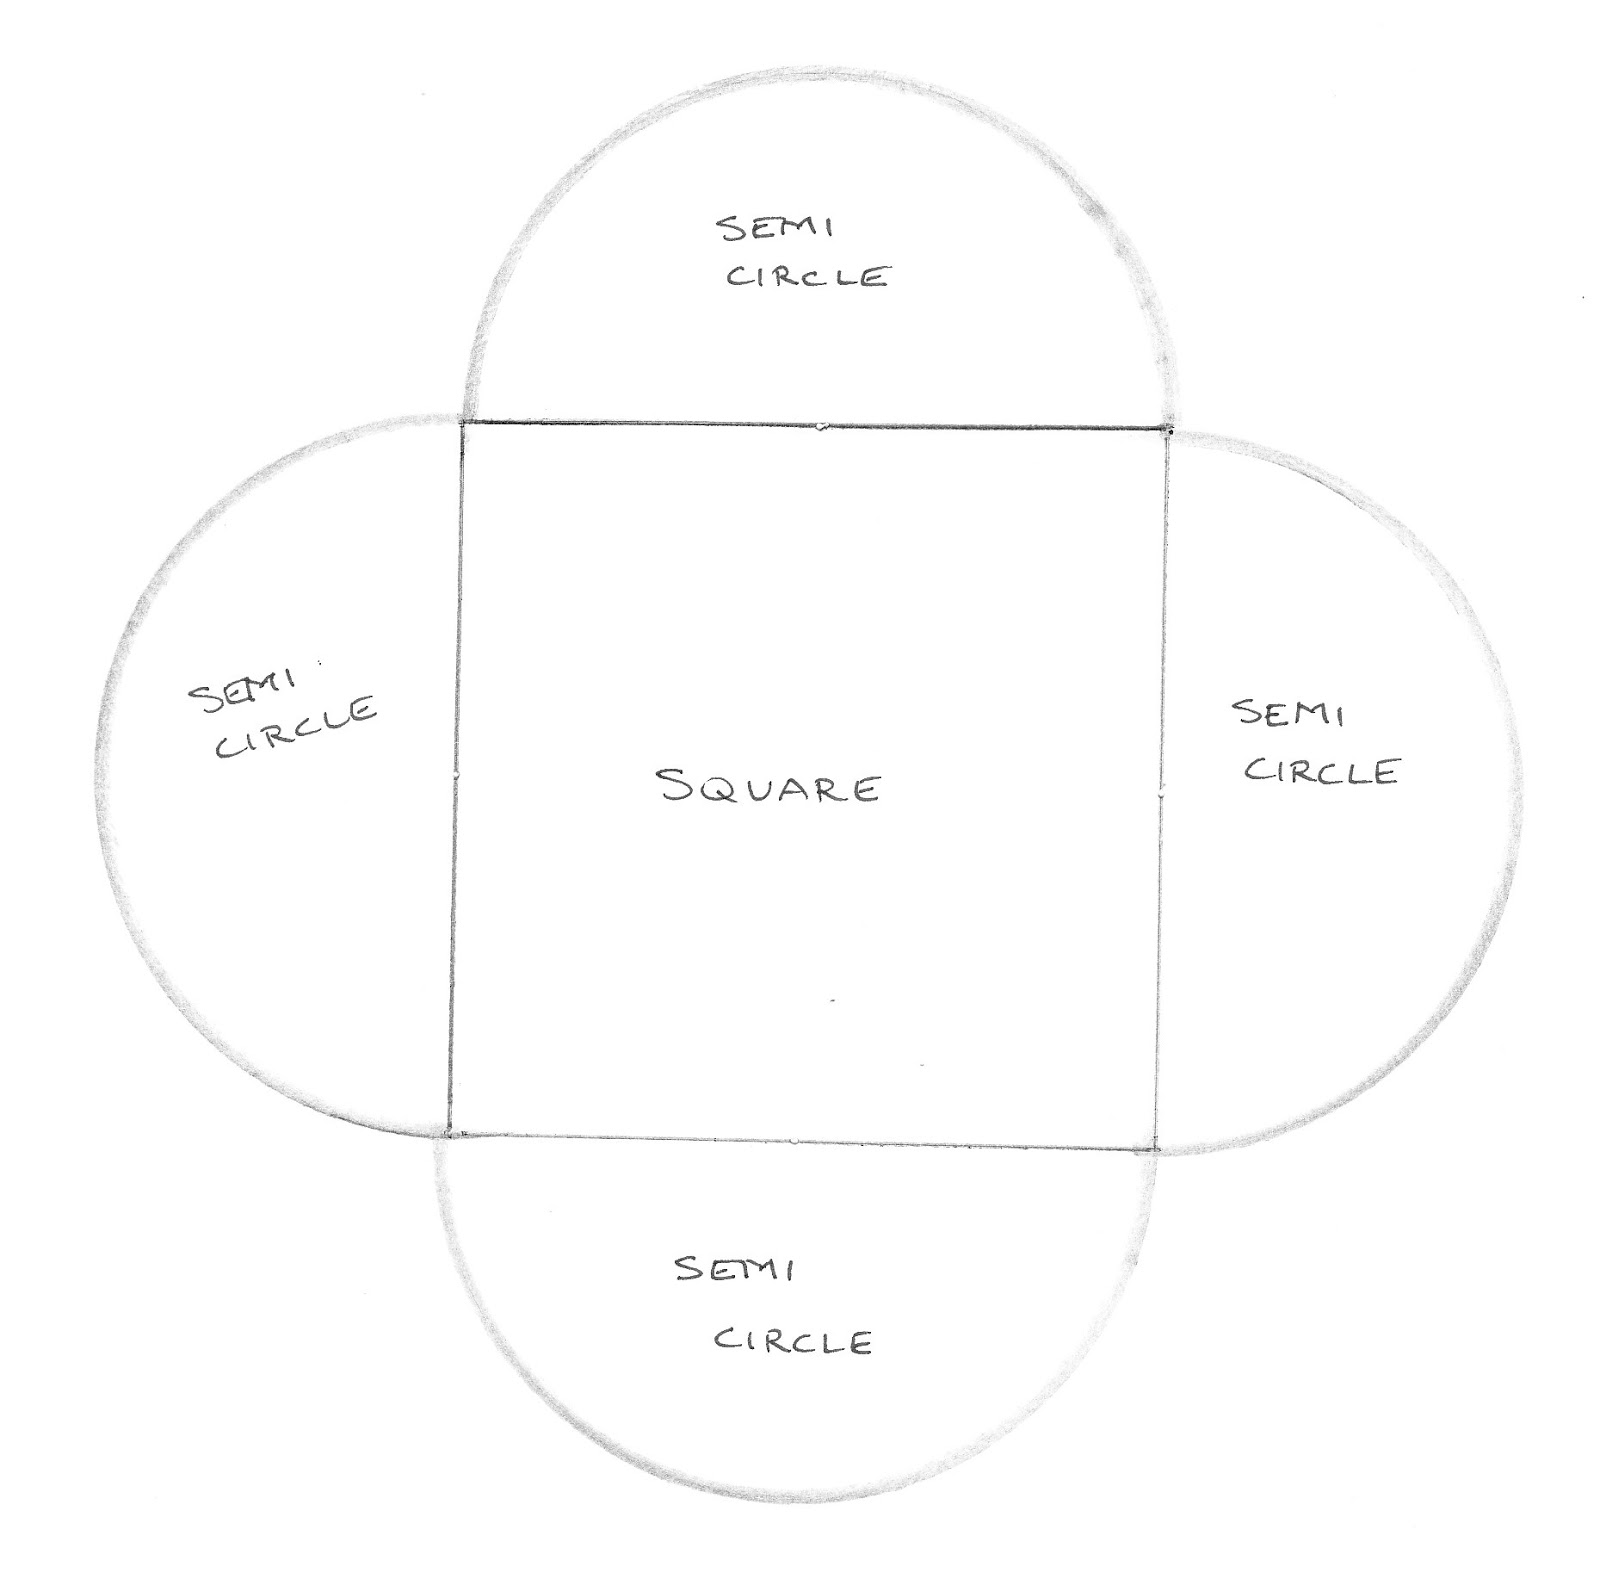
1.  The inner square should be the measurement of the book plus 4 mm.
2.  The width of the book's spine is added to create an outer square.
3.  A semi-circle is then added to each side and its diameter is the same length as the side of the inner square.
4.  The little squares on each corner are used as tabs.  You cut through the outer square on one side of the tab, and fold it on the other side and glue it to the wall of the adjacent side to form the sides of the box.  
5.  The semicircular flaps will then fold in as they did with the card and it will  have the same appearance except that it has depth rather than being flat.

(Thanks Di for inspiring me to write this post.)


Saturday, 17 March 2012

Simple Slipcase Variations

This post is a continuation from the last one about making simple slipcases. Once you can make the basic slipcase, it's very easy to adapt your pattern to accommodate other shapes, such as a triangular slipcase for a triangular book.

In this pattern, A= book width and height (book based on a square) and C= spine width. Again, a solid line indicates a folded line and a broken line indicates a cutting line. The extensions are cut to the same length and width as the spine, and are optional, but useful to glue down to reinforce the base and spine areas. You can reinforce the sides by completing the square as for a square book, making the diagonal line a fold line and gluing down the fold-in triangle on both sides.


A similar slipcase is one for a quarter circle book (again based on folded squares). Instead of cutting a diagonal line between the line where the base of the book will sit and the top of the slipcase, you cut a curved line or whichever shape it might be that fits your book.

The next post will be about making the unusual book box for That Unbearable Lightness.


A Bespoke Box


My book That Unbearable Lightness for BookArtObject evolved in the making and I wasn't sure how it would end up until I got there -which was as a sculptural structure which folds between book covers. It did, however, end up forming an unusual shape which was going to need an unusual box to house it. As five of the books were to be posted overseas, keeping the book and the box small and lightweight was a priority.
The box needed to be wider at the foredge and narrow at the spine end, and the spine edge needed to slant inwards. Obviously I was going to have to come up with an unusual solution for this particular book box.

I found a pattern for making a trapezoid, which wasn't what I needed and in all the wrong proportions - it had a small narrow top, wide base and slanted sides. I needed a lidded box to make it easy to get the book inside. However, as the trapezoid had sloping sides it gave me an idea of how to approach this box. I'm not a mathematical wiz, so with a lot of cutting and pasting and fitting pieces around the book, I eventually came up with this made-to-measure solution and made the pattern pieces below for the box and the lid. All this was the hard part, and once I had cut out the pattern pieces, it was as easy to score, fold, glue the tabs and finish the box as the other slipcases I make.......and it was perfect for this book.


Making simple slipcases and boxes

I've been making slipcases based on the same basic pattern for over 20 years. It was taken and adapted from a sock case in a book called Creative Gift Packaging by Yoko Kondo, Ondorisha Publishers, Japan, 1986. I always use Canson Card which is 300 gsm and quite heavy.

These slipcases are great for a neat presentation - but they won't withstand heavy duty knocking around, and for that you're always going to need to make a proper sturdy heavy bookbinding board slipcase or clamshell box. But they are very simple to make, light to post, and if a book comes back from an exhibition and the box has been crushed or mishandled, it is quick and easy to make a replacement for it.

In my basic pattern: A = width of spine, B = width of book, C = height of book. I add about 2-3mm. to the measurement of height and width of my book to allow for ease of entry and removal. Dotted lines indicate the lines you cut and solid lines you fold, after scoring with a bone folder.


You can make a wider based open box by substituting the width of the book you want to lie flat for the spine area measurement, but in this case the other sections marked A would be the same height as the sides of your box (which is now the spine measurement). You can then make a second box as a lid to your first box, adding 2-3mm. to the length and width of the lower box so that the lid will slip over smoothly.

After you have scored and folded all the solid lines and cut the swivel tabs, it will be obvious which pieces you glue, with acid-free pva of course.

My next posts will be about variations to this basic pattern and how I made the boxes for That Unbearable Lightness.


Wednesday, 29 February 2012

Book Boxes

I always like my books to be presented in a book box, and usually this is a black card slipcase. I worked out a pattern for making them many years ago, after reading a book on Japanese gift boxes and adapting one of them, and I've been adapting and adjusting the formula ever since.
I use Canson card, which is fairly heavy (300 gsm I think) and I've always believed it was acid free, but I've since read an article saying that black card and paper can never be really acid free, so I'm no longer sure.

For the last few days I've been working on book boxes and it has been a bit of a challenge to get the pattern for these particular boxes just right, as I do everything by making and adjusting. This box is for my first BAO edition of books, and as it is an unusual shape, it's taken me a while to design the box and pattern to fit. Once done though, it was a breeze to make them up.
They're all done - 15 of them and the books are inside too! I've been working consistently on this project even though I usually don't do too much at this time of the year when it's so hot, and I wanted to finish it early before moving on to something else. I have been surprised how much I enjoyed making the edition and enjoyed working with the streamlined methods of production.

I will add a post about the making of the books at a later date, after they've been distributed and received by the members of my BAO group five.